• Teriyaki Steak

    chicken.jpg

    Not the prettiest dish in the world but it was really good. Last month we bought a big package of grilling steak, and we portioned it up and froze it. We grilled one of them up, and either the meat was not that great to begin with or it didn’t hold up well to freezing, because it was kind of tough.

    When I was trying to figure out what to cook this week it occurred to me that the frozen steaks would be great in the crock pot. So the inspiration for this recipe comes from Crockery Cookery. I changed it quite a bit, and the recipe below reflects the changes. Cooking time is going to vary with the type of meat you use. If you use a stew meat, cook it on low for 6-7 hours. If you have a more tender cut (the kind you would just grill), cook on high for 2-3 hours.

    Not only did it taste really good, but our 3 year old devoured it…in fact, he had 3 servings. Quite an accomplishment getting that much meat into him. Definitely kid approved!

    Ingredients:

    • 1 pound steak, cut into 1 inch strips
    • 1 onion, sliced
    • 1/4 c. soy sauce
    • 1 (20oz) can unsweetened pineapple chunks, drained, and reserve juice
    • 1/4 c. finely grated or minced gingerroot
    • 1 TBSP sugar
    • 2 TBSP oil
    • 2 garlic cloves, crushed or minced
    • 2 TBSP cornstarch (you can use less if you like a thinner sauce)
    • remaining juice from the pineapple
    • Cooked rice

    Directions:

    1. Place onions on bottom of crock pot, and then place the sliced meat on top of the onions.
    2. In a small bowl, combine soy sauce, 1/4 pineapple juice, gingerroot, sugar, oil and garlic.
    3. Pour sauce over meat.
    4. Cook on high for 2.5 hours.
    5. After 2.5 hours, stir in pineapple.
    6. Combine cornstarch and remaining pineapple juice in a small bowl; add to crock pot. Cook, stirring, until slightly thickened. Serve over rice.

    Teriyaki Steak:

    4star.jpg

  • Mediterranean Eggplant and Barley Salad

    barley-salad.jpg

    This basic recipe comes from Gourmet. It is excellent! The roasted veggies melt in your mouth. I added red pepper to the roasted veggie medley, because I had one in my fridge I needed to use up and I thought it would be tasty. Definitely a great dish to bring to a pot luck, picnic, or any other event where the food will sit out. A definite crowd pleaser with lots of flavor!

    Ingredients:

    • 1.5 lbs eggplant, diced into 1.5 inch cubes
    • 3/4 lbs zucchini, diced into 1.5 inch cubes
    • 1 red pepper, julienned (my addition)
    • 2 cups cherry tomatoes
    • 1/2 cup extra-virgin olive oil
    • 1 teaspoon salt
    • 1 teaspoon freshly ground black pepper
    • 1 cup chopped green onion
    • 2 teaspoons ground cumin
    • 1 teaspoon ground coriander
    • 1/4 teaspoon cayenne pepper
    • 1.25 cups pearl barley
    • 2.5 – 3 cups chicken or vegetable broth
    • 2 tablespoons fresh lemon juice
    • 1 teaspoon minced garlic
    • 1/2 teaspoon sugar
    • 1/2 cup thinly sliced red onion
    • 1/2 cup chopped fresh mint

    Roast Eggplant, Zucchini, Red Pepper, and Tomatoes:

    1. Put oven racks in upper and lower thirds of oven and preheat oven to 425°F.
    2. Toss eggplant, zucchini, red pepper, and tomatoes with 5 tablespoons oil, 3/4 teaspoon salt, and 3/4 teaspoon pepper in a bowl, then spread in 2 oiled large shallow (1-inch-deep) baking pans.
    3. Roast vegetables in oven, stirring occasionally and switching position of pans halfway through baking, until vegetables are golden brown and tender, 20 to 25 minutes total.
    4. Combine vegetables in 1 pan and cool, reserving other pan for cooling barley.

    Cook Barley:

    1. Heat 2 tablespoons oil in a 3- to 4-quart heavy pot over moderately high heat until hot but not smoking, then cook scallion, cumin, coriander, and cayenne, stirring, until fragrant, about 1 minute.
    2. Add barley and cook, stirring until well coated with oil, 2 minutes more.
    3. Add broth and water and bring to a boil. Reduce heat and simmer, covered, until all of liquid is absorbed and barley is tender, 30 to 40 minutes.
    4. Remove from heat and let stand, covered, 5 minutes.
    5. Transfer to reserved shallow baking pan and spread to quickly cool, uncovered, to room temperature, about 20 minutes. (I skipped this step and just assembled the salad)

    Make Dressing and Assemble Salad:

    1. Whisk together lemon juice, garlic, sugar, and remaining 1/4 teaspoon salt, 1/4 teaspoon pepper, and 3 tablespoons oil in a large bowl.
    2. Add barley, roasted vegetables, and remaining ingredients to bowl with dressing and toss until combined well.
    Mediterranean Eggplant and Barley Salad:
    5star.jpg
  • Apple Coffee Cake

    apple-cake.jpg

    This recipe comes from my Grandma Clark. Not sure if she created it, but if I were to guess, she got it from someone else. My Grandma is a great cook, but she doesn’t usually create her own recipes, she’s got a collection of recipes that puts mine to shame! Anyway, I make this cake every fall, and since we recently bought a 5lb bag of apples, I decided to put this recipe to use.

    Ingredients:

    • 2 c. sugar
    • 1 c. oil
    • 2 eggs
    • 1 tsp vanilla
    • 1 c. nuts (I always omit)
    • 3 c. apples, peeled and chopped
    • 1.5 tsp. baking soda
    • 3 c. flour
    • 1/2 tsp. salt
    • 1 tsp. nutmeg
    • 1 tsp. cinnamon

    Directions:

    1. Mix sugar, oil, eggs and vanilla.
    2. Sift dry ingredients and add the first mixture. It’s a thick cake batter (like thick oatmeal).
    3. Fold in apples and nuts.
    4. Spread into greased and floured 10×13 baking pan, and push/flatten the batter down with your hands. Bake at 350 for 40-45 minutes.
    5. Once baked add topping:
    • 1/3 c. sugar
    • 1/2 c. nuts (I always omit)
    • 1 tsp. cinnamon
    • Serve with whipped cream or ice cream

    Apple Coffee Cake:

    5star.jpg

  • Spicy Thai Cold Noodles With Crushed Peanuts and Cilantro

    cold-thai-noodle-salad.jpg

    This recipe comes from Wolfgang Puck’s Pizza, Pasta, and More! cookbook. It makes for a great light dinner or side dish. You can easily make this the main event by adding chicken, beef, or tofu. One of my favorite Thai dishes is the fresh spring roll. Not the deep fried ones, but the ones in rice paper, that have rice noodles and veggies in them. This dish reminds me of an inside out fresh Thai spring roll. This dish was really good the first night we had it, then the next day for lunch we had it and it was excellent. It really benefited from overnight refrigeration. So definitely plan to make this one ahead of time. We tried it first without the fresh lime juice (honestly because I forgot to put the limes on the table) and it was good, but the fresh lime juice really brightens the flavor…so don’t forget the limes! We’ll definitely make this one again.

    Dressing:

    • 3 TBSP light brown sugar
    • 2 TBSP plus 1 tsp. soy sauce
    • 2 TBSP rice wine vinegar
    • 1 TBSP plus 1 tsp chili and garlic oil. Instead of making Puck’s chili and garlic oil, I just used oil, and added crushed red pepper and minced 2 garlic cloves.

    Salad:

    • 12 oz angel-hair pasta, allowed to dry after cooking. Puck says lay it out on a flat pan so noodles retain shape and don’t stick. I couldn’t accomplish this, so I went ahead and mixed the salad together then refrigerated.
    • 1.5 oz (1/4 c.) Japanese pickled ginger, chopped
    • 3/4 green onions, cut into 1 inch slices
    • 1/2 c. fresh parsley leaves
    • 1 cucumber, julienned
    • 1/4 c. julienned carrots
    • 1/4 c. roasted peanuts, coarsely chopped
    • 1/4 c. minced cilantro leaves
    • 8 wedges of lime

    Directions:

    1. Make the dressing: In a small bowl, whisk together the sugar, soy sauce, vinegar, and oil. Set aside.
    2. When pasta is dry, place it in a large bowl and pour the dressing over. Toss to combine and let rest 1 or 2 minutes so that the dressing is absorbed. Add the remaining ingredients, reserving a few peanuts, scallions, and cilantro for garnish, and gently toss to combine. My advice: Don’t bother waiting for the pasta to dry, just combine everything and refrigerate. I’d refrigerate for as long as possible before serving.
    3. To serve, garnish with peanuts, scallions, cilantro and lime wedges.

    Spicy Thai Cold Noodles with Crushed Peanuts and Cilantro:

    4star.jpgto 5star.jpg

  • Today’s Macaroni and Cheese-It’s not just for kids

    todays-mac-n-cheese.jpg

    This recipe comes from Rick Bayless’ Salsas that Cook cookbook. This cookbook has 6 core salsa recipes, and each recipe in the cookbook utilizes one of the 6 salsas. I chose to make the Today’s Macaroni and Cheese-It’s not just for kids recipe with the Roasted Poblano-Tomato Salsa. Salsa was good. Mac-n-Cheese was good. Probably won’t be making either of them again, but maybe your tastes differ from ours.

    Roasted Poblano-Tomato Salsa

    Ingredients:

    • 1 lb. ripe tomatoes
    • 2 medium poblanos
    • 1/2 small red onion, sliced 1/4 inch thick
    • 4 garlic cloves, peeled
    • 1/2 c. tomato puree
    • 1/2 c. water
    • 2 TBSP cilantro
    • 2 tsp. chopped fresh thyme
    • 2 tsp. salt

    Directions:

    1. Broil poblanos and tomatoes until they blister and blacken. Turn so there is an even roast. Remove and place poblanos in a ziploc bag for 10 minutes.
    2. Turn oven to 425. On a baking sheet roast the onion and garlic, until richly browned-about 15 minutes.
    3. Remove poblanos from bag and peel the charred skin from the pepper. Remove the stem and seeds.
    4. In a food processor, pulse onion, garlic, poblanos, tomatoes until its chunky. Pour salsa into bowl. Add tomato puree, water, cilantro, thyme, and salt.

    Today’s Macaroni and Cheese-It’s not just for kids

    Ingredients:

    • 2 c. milk
    • 4 TBSP butter
    • 1/4 c. flour
    • 2 cups Roasted Poblano-Tomato Salsa
    • 3 c. shredded cheddar cheese
    • 1/2 tsp. slat
    • 1 lb dried pasta
    • 2 TBSP cilantro for garnish

    Directions:

      1. Prepare pasta as directed
      2. Warm the milk, either in the microwave or on the stove
      3. In a medium-size saucepan, melt the butter over medium heat, then stir in the flour and whisk until the mixture turns deep gold, about 2 minutes. Add the warmed milk all at once and continue to whisk constantly until the mixture thickens and comes to a full boil, 4 to 5 minutes. (Whisk diligently and there will be no lumps.) Stir in the salsa, remove from heat, then add the cheese and stir until it melts. Taste and season with salt.
      4. Once pasta is cooked, return the pasta to the pot. Stir in the cheese sauce, then spoon into a serving dish. Sprinkle with cilantro.
      5. Your can also put the mac-n-cheese into a buttered baking dish. Top with buttered bread crumbs and bake at 375 until browned, about 10-12 minutes.
        Roasted Polbano-Tomato Salsa:3star.jpg

        Today’s Macaroni and Cheese-It’s not just for kids:

        3star.jpg

  • Chicken in Honey Sauce

    honey-chicken.jpg

    This recipe comes from the Rival Crock-Pot Slow Cooker Best-Loved Recipes cookbook. It’s good but quite sweet, and would probably benefit from some heat (chipotle peppers or crushed red pepper would be a nice addition) to balance the sweet. We’ll probably make this one again because it was certainly kid approved, which is hard to come by these days. I halved the recipe, but the recipe below is the full one.

    Ingredients:

    • 6 boneless skinless chicken breasts
    • salt and pepper to taste (I omitted the salt, because I think there’s enough from the soy sauce.)
    • 2 cups honey
    • 1 cup soy sauce
    • 1/2 cup ketchup
    • 1/4 cup oil
    • 2 garlic cloves, minced
    • sesame seeds

    Directions:

    1. Place chicken in crock pot; season with salt and pepper.
    2. Combine honey, soy sauce, ketchup, oil and garlic in medium bow. Pour over chicken.
    3. Cover and cook on low for 6 hours or high for 3 hours.
    4. Garnish with sesame seeds.

    Chicken in Honey Sauce:

    3star.jpg

  • Peach Crunch

    peach-crunch.jpg

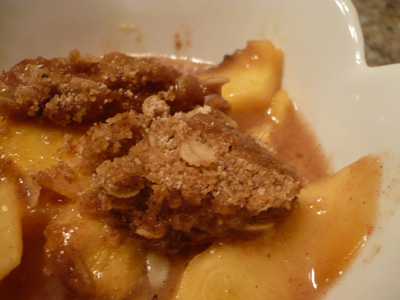
    This recipe comes from Stephan Pyles’ New Tastes From Texas. The first time I made this dessert was summer of 2002, and it’s become an annual traditional, and since I hadn’t yet made the peach crunch this year, I thought it was time. Recipe calls for peaches, but I’ve used nectarines and blueberries with tasty results. Great use for over ripe peaches, but if you use under ripe fruit, be sure to bump up the cooking time in order to get the fruit nice and tender. -s loves the crunch topping, so I generally double the crunch topping, but bellow is the recipe as published.

    Ingredients:

    • 8 medium-size ripe peaches, peeled and sliced
    • 2 tsp fresh lemon juice
    • 3 tsp granulated sugar
    • 1/2 tsp ground ginger
    • 4 TBSP unsalted butter
    • 1/4 cup oats
    • 1/2 cup all-purpose flour
    • 3/4 cup firmly packed light brown sugar
    • 1/ cup chopped pecans (I omit)
    • 1 tsp ground cinnamon
    • 1/2 tsp grated nutmeg

    Directions:

    1. Preheat oven to 350. Butter a 9 or 10 inch baking dish.
    2. For the fruit filling, toss the peaches in a large bowl with the lemon juice, sugar, and ginger. Lay the fruit in the buttered baking dish.
    3. For the crunch topping, place the butter, oats, flour, brown sugar, pecans, cinnamon, and nutmeg in a mixing bowl. Combine with your fingers until crumbly and thoroughly mixed.
    4. Cover the fruit filling with the crunch topping.
    5. Bake for 30-35 minutes or until crunch is browned.

    Peach Crunch:

    5star.jpg

  • Dream Pie-Banana Cream Pie

    pie.jpg

    This cream pie is classic. Easy to make. Enjoyed by all. The recipe comes straight from the Dream Whip box. If you’ve never used Dream Whip, give it a try-it’s located in the baking aisle. No cooking, just mix and refrigerate-what could be easier? This pie recipe is one of my husband’s favorite. The great thing about this recipe is that it’s so versatile. Use any flavor pudding you like…chocolate, vanilla, coconut, strawberry, etc…the skies the limit!

    Ingredients:

    • 2 envelopes of Dream Whip
    • 2.75 cups cold milk, divided
    • 1 tsp. vanilla
    • 2 pkg (4 serving size each) JELL-O Instant pudding and pie filling, any flavor (we use instant banana cream)
    • 1-2 bananas, sliced (our addition)
      1 baked pastry shell (9 inch) or 1 Honey Maid Graham Pie Crust (we use graham cracker crust)

    Directions:

    1. Beat whipped topping mixes, 1 cup of the milk and vanilla in a large bowl with electric mixer on high speed for 6 minutes or until topping thickens and forms peaks.
    2. Add remaining 1.75 cups milk and pudding mixes; beat on low speed until ingredients are incorporated. Beat on high speed 2 minutes, scraping bowl occasionally.
    3. Place sliced bananas on the pastry shell, and spoon the pie mixture over the bananas.
    4. Refrigerate at least 4 hours.

    Dream Pie-Banana Cream Pie:

    5star.jpg

  • Dream Cake

    dream-cake.jpg

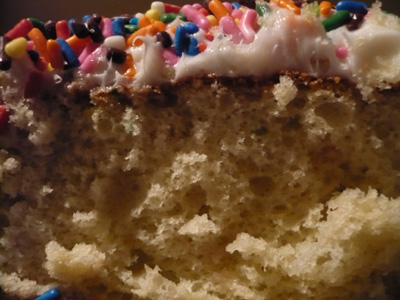
    We use Dream Whip when we make Banana Cream Pie, and I happened to notice on the box a cake recipe that uses Dream Whip. Intrigued, I decided to give it a try. Basically, choose your favorite box cake, and instead of adding oil to the mix, you add an extra egg along with the Dream Whip. The cake turned out very fluffy, although not having made a cake that follows the box cake recipe to compare in a side by side comparison, I can’t say exactly that the Dream Cake was that much more fluffy, but if memory serves me correctly, it is that much more fluffy. Definitely worth trying.

    Ingredients:

    • 1 box cake mix of your choosing
    • 1 envelope of Dream Whip
    • 4 eggs
    • 1 cup cold water

    Directions:

    1. Heat oven to 350. Grease and flour 2 (9 inch) round cake pans. I used a 9×13 pan and used cooking spray and that worked just fine.
    2. Beat cake mix, Dream Whip, eggs and water in a large bowl with electric mixer on low speed until moistened. Beat on medium speed 4 minutes.
    3. Pour into prepared pans
    4. Bake according to instructions on your cake mix box
    5. Frost as you wish

    Dream Cake:

    5star.jpg