• Hummus

    hummus.jpg

    We make a hummus recipe that is super tasty, but you definitely have to plan ahead. The dried chick peas have to soak over night and then they cook for nearly 2 hours. I was wanting hummus last night, but I wanted to make a super fast hummus. It turned out quite tasty.

    Ingredients:

    • 1 15 oz. can garbanzo beans
    • 1/3 c. tahini
    • Juice of 2 lemons
    • 2 garlic cloves
    • 4 TBSP olive oil
    • 1 TBSP parsley
    • Salt to taste
    • Olive oil for drizzle
    • 1/4 tsp. sumac

    Directions:

    1. Combine garbanzo beans through salt in a food processor until all ingredients are combined and the hummus is creamy.
    2. Put hummus into a bowl, drizzle some olive oil on top, and sprinkle the top with sumac.

    Hummus:

    4star.jpg

  • Garlic Sauce

    garlic-dip.jpg

    By far the finest Middle Eastern cuisine is Fadi’s in Houston. When we lived in Houston we ate there quite often. We have yet to find any restaurant anywhere that even comes close to the taste and quality at Fadi’s.

    Two of my most favorite items there are vegetarian stuffed grape leaves and chicken kebabs. The chicken kebabs and sandwiches come with this delicious garlic sauce…kind of like a super garlicky mayo.

    Last night we prepared some Middle Eastern food for dinner. We didn’t have the time to make proper kebabs, so we just grilled up some chicken, and I made some garlic dip, and a super fast hummus.

    The garlic dip recipe comes from Anissa Helou’s Lebanese Cuisine cookbook. The dip was excellent!

    Ingredients:

    • 8 garlic cloves
    • 1/4 tsp. salt
    • 1 egg yolk
    • Juice of 1/2 lemon
    • 4 TBSP olive oil
    • 1 TBSP yogurt

    Directions:

    1. Chop the garlic, add the salt to the garlic and with the back of your knife, make a paste by adding pressure to the knife as you run the knife over the garlic. The salt acts as an abrasive and helps the garlic turn into a nice paste.
    2. Whisk the egg in a mixing bowl and then add the garlic paste. Stir in the lemon juice, then slowly whisk int he olive oil; then add the yogurt.
    3. Use the garlic sauce as a dip for grilled chicken.

    Garlic Sauce:

    4star.jpg

  • Pesto Pizza

    pesto-pizza.jpg

    We love making homemade pizza, and we’ve started experimenting with our toppings. This pesto pizza is delicious. Either use homemade pesto or store bought pesto. If you use store bought pesto, when you open the container do not stir the oil into the pesto. Remove the oil, so you can get to the basil goodness bellow the oil (if you stir the oil into the pesto, the pesto will be too oily as a sauce base for your pizza).

    Ingredients:

    • Pizza dough
    • Pesto (you’ll probably only use a few Tablespoons–don’t use too much)
    • 1/2 to 1 lb. fresh mozzarella, sliced
    • 1/2 c. roma, grape, or cherry tomatoes, sliced
    • olive oil
    • 2 TBSP fresh basil, chiffonade

    Directions:

    1. Preheat oven to 500 (or as high as it goes). Roll out your dough. Spread the pesto, top with cheese, and tomatoes. Using a pastry brush, brush the crush with olive oil.
    2. Bake for 6 or 7 minutes on a pizza stone, or until done. Top with fresh basil.

    Pesto Pizza:

    5star.jpg

  • Chicken Teriyaki

    chicken-teryiaki.jpg

    I found this recipe at Closet Cooking. I added strips of fresh ginger to the sauce, and it was really good, and actually tasted much like the sauce from the Pineapple Sesame Chicken recipe.

    Ingredients:

    • 6 TBSP soy sauce
    • 6 TBSP mirin
    • 6 TBSP sake
    • 2 TBSP sugar
    • 2 inch ginger chunk, thinly sliced
    • 1 lb. chicken, bite size pieces
    • olive oil or sesame oil
    • Broccoli florets

    Directions:

    1. Combine all ingredients in a sauce pan; bring to a slow boil to dissolve sugar; let cool.
    2. Pour sauce over chicken and marinate for 30 minutes to a few hours.
    3. Heat a large nonstick skillet or wok over medium high heat. Add olive oil or sesame oil. Remove chicken from marinade and add chicken to skillet, reserving the marinade; saute until chicken is cooked; then remove chicken from the pan. Pour the marinade into the skillet and boil until the sauce reduces and thickens. Remove the ginger.
    4. Meanwhile blanch broccoli in salted water.
    5. Serve chicken and broccoli over rice and drizzle with the sauce.

    Chicken Teriyaki:

    4star.jpg

  • Updated Pizza Recipe: What -S Makes

    025.jpg

    Rachel has been bugging me for awhile to put up the pizza dough recipe we actually use to make pizza, as we don’t use the “Homemade Pizza” recipe from way back when. Actually after she put up that post, I was talking to the guys at Apizza in Stayton, Oregon and Shannon suggested a few changes, most of which I remembered but I’m not sure if I still do everything as he suggested, so you can assign authorship to whomever you’d like. Either way, Apizza is probably one of the 5 best places in the U.S. that I’ve had pizza, so you should check them out if you’re ever near Portland or Salem in Oregon.

    One thing I have done is make it work with round numbers, as I’m generally a little too lazy to tolerate all of the 3/4 tsp type stuff that the Giada recipe has in it. Here’s what you need per batch of dough (I usually make two, which makes two pizzas the size of our oven stone and two portions of my version of crazy bread, with one dough left over to do whatever with.):

    • 1 cup of cold water
    • 1 packet rapid rise yeast
    • 2 (or more) cups flour
    • 1 tsp kosher salt
    • 3 tbsp olive oil

    Put the yeast into the water and let sit until the yeast dissolves, about 5 minutes.

    In a food processor with the dough blade, combine flour, salt, olive oil, and yeast/water mixture and process until the ingredients form a ball. This may require the addition of flour.

    Take dough from food processor and put it on a floured surface and knead until dough is smooth, about 5-10 minutes.

    Prepare a large bowl by coating it with olive oil. Place dough in bowl, cover with plastic wrap, and place in the refrigerator until it doubles in size (or more, if you aren’t the type to check it constantly. Just makes sure it gets quite a bit bigger than when it went in.) Depending on the enthusiasm of the yeast, this could take anywhere from 4-5 hours to overnight. I’ve had no problems doing the dough in the morning and having it ready for dinner. If it just doesn’t seem to be working, do a warm rise in the way described in the original recipe, and if necessary stretch the time to 2 hours of warm rise. Punch down the dough, cut whatever size you need, and roll it out on a lightly floured surface.

    An hour before you want to bake your pizza

    Place your pizza stone in the center rack of the oven and gun your oven as high as it will go. Make loud, enthusiastic noises to celebrate this opportunity to push your oven to its limits.

    What I do

    When I roll out dough to make a pizza pie, I use a lightly floured wood French rolling pin and I roll it out pretty thin. I put some corn meal on the pizza peel (not too much!!) and put the dough on there…it’s a pain to top the pie on your board and then put it on the peel. I lightly brush the surface of the dough with olive oil and then top. It will bake for 6 or 7 minutes — I try and take it as brown as possible without burning.

    023.jpg
    Picky kids

    What you’re quietly wishing I would tell you

    My version of crazy bread (I worked for Little Caesars for two years in college, so it has a spot in my heart.)

    Take a ball of dough about half the size you would use for a pizza and on a floured surface roll it out in an oval shape about not more than 1/4″ thick. Cut width-wise into strips using a pizza peel. Bake for 5 to 6 minutes.

    The topping:

    • 1/2 stick of butter
    • 4 cloves of garlic, minced
    • Italian seasoning
    • Cheap parmesan cheese from a plastic container you find in the Italian aisle at your local grocer

    Put butter and garlic in a small pot over medium-low heat and cook until butter is melted. Dump/drizzle/brush mixture over baked sticks. Shake Italian seasoning and cheese over the sticks (keep in mind that the cheese is essentially the salt for the dish, so be generous.)

    5star.jpg

  • Strawberry Tart

    strawberry-tart.jpg

    One of my favorite desserts is a fruit tart. I’ve never made a tart before, because I never had a tart pan…until now. Probably my absolute favorite fruit tart is from La Medelieine’s, but we no longer live near one, so it’s now it’s up to me to make them. I found this recipe, and gave it a try. It was really good! -s really enjoyed it too. I made a few minor changes, namely I substituted orange juice for the orange liqueur. I used 2 tsp. of juice, but next time I’ll use 1 tsp. Another option is to substitute lemon zest and juice for the orange zest and juice. You can also use any berry or fruit you like, or make the tart with lots of different fruit and/or berries. The filling on this recipe is cream cheese based, so it’s quick and easy. I prefer the more traditional filling of pastry cream or lemon curd, but you can’t beat the ease and simplicity of the cream cheese. Next time I’ll try making it with a pastry cream or lemon curd.

    Tart Dough Ingredients:

    • 1 egg yolk
    • 2 TBSP very cold water
    • 1 tsp. vanilla extract
    • 1 1/4 c. unbleached all-purpose flour
    • 1/3 c. sugar
    • 1/4 tsp. salt
    • 8 TBSP (1 stick) cold unsalted butter, cut into
      1/4-inch cubes

    Cream Filling Ingredients:

    • 8 oz. cream cheese, at room temperature
    • 1/4 c. sugar
    • 1 tsp. finely grated orange zest
    • 1 tsp. orange juice
    • 2 c. fresh strawberries, hulled and halved or quartered (depending on berry size) lengthwise
    • 1 c. apricot jam

    Directions:

    1. Dough: In a small bowl, stir together the egg yolk, water and vanilla; set aside.
    2. To make the dough in a stand mixer fitted with the paddle attachment, stir together the flour, sugar and salt in the mixer bowl. Add the butter and beat on medium-low speed until the texture resembles coarse cornmeal, with butter pieces no larger than small peas. Add the egg mixture and beat just until the dough pulls together.
    3. Transfer the dough to a work surface, pat into a ball and flatten into a disk. Use the dough immediately, or wrap in plastic wrap and refrigerate until well chilled, about 30 minutes.
    4. To roll out the dough, on a lightly floured board, flatten the disk with 6 to 8 gentle taps of the rolling pin. Lift the dough and give it a quarter turn. Lightly dust the top of the dough or the rolling pin with flour as needed, then roll out until the dough is about 1/8 inch thick. Makes enough dough for one 9 1/2-inch tart.
    5. Fold the dough round in half and carefully transfer to a 9 1/2-inch tart pan, preferably with a removable bottom. Unfold and ease the round into the pan, without stretching it, and pat it firmly into the bottom and up the sides of the pan. Trim off any excess dough by gently running a rolling pin across the top of the pan. Press the dough into the sides to extend it slightly above the rim to offset any shrinkage during baking.
    6. Refrigerate or freeze the tart shell until firm, about 30 minutes. Meanwhile, position a rack in the lower third of an oven and preheat to 375°F.
    7. Line the pastry shell with aluminum foil or parchment paper and fill with pie weights or raw short-grain rice. Bake for 20 minutes, then lift an edge of the foil. If the dough looks wet, continue to bake, checking every 5 minutes, until the dough is pale gold, for a total baking time of 25 to 30 minutes. Remove the weights and foil. Continue to bake until the shell is golden, 7 to 10 minutes more. Transfer to a wire rack and let cool completely.
    8. Filling: In the bowl of an electric mixer fitted with the flat beater, beat the cream cheese and sugar on medium speed until smooth. Mix in the orange zest and orange juice. Spread the cream cheese mixture evenly over the bottom of the tart shell. Arrange the strawberry halves, overlapping them, in concentric circles on top of the cream cheese, completely covering the surface.
    9. Glaze: In a small saucepan over low heat, warm the apricot jam until it liquefies. Pour through a fine-mesh strainer set over a small bowl. Using a small pastry brush, gently brush the strawberries with a thin coating of jam. Refrigerate until ready to serve. Let stand at room temperature for 20 minutes before serving. Makes one 9-inch tart.

    strawberry-tart-2.jpg

    ***

    strawberry-tart-3.jpg

    Strawberry Tart:

    4star.jpg

  • Cincinnati Chili

    Cincinnati Chili.jpg

    I love Cincinnati Chili. I came across a new recipe and wanted to give it a try. I followed the recipe exactly and by the time the cooking time was up, the chili was super thick–too thick for my liking. I like mine a bit saucier. It’s been so long since I’ve made Cincinnati Chili that I can’t remember what my other recipe tastes like to compare, so maybe Cincinnati Chili Take 2 will be on next week’s menu.

    Ingredients:

    • 1 onion, chopped
    • 1 lb extra-lean ground beef
    • 1 garlic clove, minced
    • 1 TBSP chili powder
    • 1 tsp ground allspice
    • 1 tsp ground cinnamon
    • 1 tsp ground cumin
    • 1/2 tsp red (cayenne) pepper
    • 1/2 tsp salt
    • 1 1/2 Tbsp unsweetened cocoa
    • 1 15 oz can tomato sauce
    • 1 TBSP Worcestershire sauce
    • 1 TBSP cider vinegar
    • 1/2 c. water
    • 1 lb. spaghetti
    • Toppings: kidney beans, cheddar cheese, onions, or oyster crackers

    Directions:

    1. In a large frying pan over medium-high heat, saute onion, ground beef, garlic, and chili powder until ground beef is slightly cooked. Add allspice, cinnamon, cumin, cayene pepper, salt, unsweetened cocoa or chocolate, tomato sauce, Worcestershire sauce, cider vinegar, and water. Reduce heat to low and simmer, uncovered, 1 1/2 hours. Remove from heat. Ladle chili over spaghetti.
    2. Two way: Chili over spaghetti
    3. Three way: Add cheese to the two way
    4. Four way: Add onions to the three way
    5. Five way: Add kidney beans to the four way

    Cincinnati Chili:

    3star.jpg

  • Fish with Jalapeno Cream

    jalapeno-cream.jpg

    This recipe comes from Rick Bayless’s Salsas that Cook cookbook. The premise of the cookbook is a core set of salsa recipes that are used throughout the cookbook in varies other recipes. The jalapeno cream uses the roasted jalapeno-tomato salsa with fresh cilantro. The salsa was very good–good enough to keep in our arsenal of salsas, so that says something! I liked the addition of the cream for the sauce on the fish, but -s thought the cream took away from the roasted distinct flavor of the salsa. He would’ve preferred the fresh salsa over the fish. We’ll definitely make the salsa recipe again, but probably not the jalapeno cream.

    Ingredients for Roasted Jalapeno-Tomato Salsa with fresh Cilantro:

    • 10 medium plum tomatoes
    • 2 jalapenos, stemmed
    • 1/2 small white onion, sliced 1/4 inch thick
    • 4 garlic cloves, peeled
    • 1/3 c. cilantro, chopped
    • 1 tsp. salt
    • 1 1/2 tsp. cider vinegar
    • Fish
    • Hot rice

    Directions:

    1. Broil the tomatoes and jalapenos whole until darkly roasted on all sides, about 15 minutes. Set aside and cool.
    2. Turn oven to 425, and combine the onion and garlic, and roast until onions are browned and wilted and garlic is soft and browned in spots, about 15 minutes.
    3. In a food processor, pulse the jalapenos, onion, and garlic until moderately finely chopped, scraping everything down with a spatula as needed. Scoop into a big bowl. Then add the tomatoes to the food processor, and coarsely puree the tomatoes, and add to the bowl. Add cilantro, salt, and vinegar.
    4. Bake fish in the oven at 350 until done.

    Jalapeno Cream Ingredients:

    • 1 1/2 c. Roasted Jalapeno – Tomato Salsa
    • 1/2 c. cream

    Directions:

    1. Add salsa to a saucepan and cook until salsa boils, add the cream and heat through.
    2. Ladle sauce over fish and rice.

    Roasted Jalapeno – Tomato Salsa:

    4star.jpg
    Jalapeno Cream:

    3star.jpg

  • Turkey Meatballs

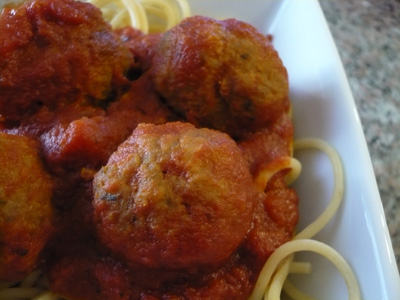
    turkey-meatballs.jpg

    My family loves meatballs, and since this recipe uses ground turkey instead of ground beef, it’s definitely a healthier alternative. My kiddos devour turkey meatballs just as they do beef meatballs. Over many times making and honing this recipe, I’ve found that the longer the sauce simmers, the thicker, the richer, and the yummier the sauce gets, so if you have the time, simmer away.

    Ingredients:

    • 1 TBSP olive oil
    • 4 garlic cloves, minced
    • 1 28 oz can of crushed tomatoes
    • 1 28 oz can of tomato puree
    • 2 tsp. Italian seasoning, divided
    • 1/4 tsp. dried thyme
    • salt and pepper to taste
    • sugar–amount will definitely depend on how sweet your canned tomatoes are and how sweet you like your sauce. Taste sauce, season, taste again, repeat…
    • 1 lb. ground turkey
    • 1 egg
    • 1/2 c. Italian seasoned bread crumbs
    • 1/2 c. pecorino romano cheese
    • 1 lb. pasta

    Directions:

    1. Sauce: in a large nonstick skillet, heat olive oil over medium high heat, add garlic and cook for 1 minute; stir in 1 tsp. Italian seasoning, thyme and tomatoes. Season with salt, pepper and sugar. Bring to a boil; reduce heat cover and simmer for at least 25 minutes….longer if you can.
    2. Meatballs: in a large bowl, combine ground turkey, egg, bread crumbs, cheese and remaining 1 tsp. of Italian seasoning. Form 1 1/2 inch meatballs.
    3. Add meatballs to sauce, spooning sauce over to coat. Cover and cook over medium heat until meatballs are just cooked through, about 8 minutes.
    4. Meanwhile while meatballs are cooking, cook pasta.

    Turkey Meatballs:

    4star.jpg

  • Stuffed Cabbage

    stuffed-cabbage.jpg

    Stuffed cabbage is a nostalgic meal for me. My Grandma Boden made the best stuffed cabbage. Unfortunately she never wrote down her recipe. A few years ago, my step-mom made a recipe from her Jewish Cookery cookbook, and her stuffed cabbage tasted almost exactly how I remembered Grandma’s tasting. The original recipe calls for adding water to the sauce, which I did, but I like my sauce thicker, so next time I’ll leave the water out. I confirmed with her after I made the recipe that she too leaves the water out. The sweet and sourness of the sauce go really well with stuffed cabbages. While it’s probably not Grandma’s exact recipe, it’s as close as close can be:
    Ingredients:

    • 1 lb. ground beef
    • 2/3 c. cooked rice
    • 1 egg
    • 1 onion, grated
    • 1 carrot, grated
    • 1/4 tsp. salt
    • 1 head of Savoy cabbage leaves (savoy cabbage is more tender and pliable), leaves removed and washed (or 2 heads of regular cabbage, don’t use the dark green outer leaves as they are tough even after cooking)
    • 1/2 c. lemon juice (+ a bit more)
    • 1 c. brown sugar (+ a bit more)
    • 3 c. tomato sauce (about 24 oz. preferably Del Monte, because that’s what Grandma used)

    Directions:

    1. Combine meat, rice, egg, grated onion, grated carrot, and salt.
    2. Soften cabbage leaves in boiling water for 5 to 10 minutes; then drain. I used about 20 leaves, but depending on the leaf size and how much meat you put in each one, you may need more or less leaves.  If the ends of the leaves are tough, remove the tough part.
    3. Combine the lemon juice, brown sugar, and tomato sauce in a mixing bowl.
    4. Working with one leaf at a time, place a leaf on your work surface. Depending on the cabbage leaf size, place a small mound of meat (about the size of a medium sized meatball) at the bottom of the leaf (closest to the end where the leaf was attached). Roll the leaf, tucking the sides in securely, like you roll an egg roll.
    5. Place stuffed cabbage closely together in a heavy pan. Add sauce. Cover and cook over moderate heat for 30 minutes; then reduce heat to a simmer and cook for 20 more minutes. Remove the lid and place in a 350 oven for 20 minutes to brown the top–mine didn’t brown, but were still delicious.
    6. CROCKPOT: prepare stuffed cabbage as above except put stuffed leaves in crockpot, cover with sauce and cook on low for 7-8 hours.

    Stuffed Cabbage:

    5star.jpg