• Curried Chicken Breasts

    We made this Indian curry chicken recipe for the second time tonight. The recipe is from Not Your Mother’s Slow Cooker Recipes for Two. The first time we made it we cut the chicken up and tonight we put the entire chicken breasts in. We both thought it was better when the chicken was cut up. I can’t quite put my finger on why the cut up chicken was better, it just was. This recipe can easily be doubled to serve more than 2, and it calls for making your own curry paste, which can be refrigerated for weeks.

    I’ve always been disappointed with boneless chicken prepared in the crockpot, but I learned from this cookbook that boneless chicken is best prepared on high heat for a short time, only 2.5-3 hours. The first time we prepared this dish we doubled it and the time was still no longer than 3 hours. If you cook the chicken longer it starts to dry out.

    This dish is excellent.

    SUJATA’S CURRY PASTE:

    2 TBSP ground coriander

    1.5 tsp ground cumin

    1.5 tsp ground turmeric

    1/4 tsp chili powder

    1 tsp brown mustard seed, crushed with a mortar and pestle

    1/4 tsp ground cloves

    1/4 tsp ground cardamom

    1/4 tsp ground cinnamon

    1.5 TBSP apple cider vinegar

    1-2 TBSP water, as needed (enough to make a paste)

    1 small onion, sliced into rings

    2 to 3 boneless, skinless chicken breasthalves, trimmed of fat

    1/4 tsp salt

    1.5 TBSP Sujata’s Curry Paste

    1 tsp sesame oil or olive oil

    1/4 cup heavy cram or half-and-half

    1. To make the curry paste, combine all of the spices in a small bowl with a fork. Mix in the vinegar, then drizzle inthe water to make a loose paste.

    2. Spray the inside of the crock with nonstick spray. Place the sliced onion on the bottom for the chicken to sit on. Mix together the curry paste and the oil; rub on the chicken to coat both sides. Place the chicken breasts in the slow cooker and sprinkle with salt. Cover and cook on HIGH for 2.5 to 3 hours.

    3. Stir in heavy cream, and add salt to taste.

    We cooked up some green beans and added them to the dish at the very end…very tasty addition

    Serve over hot rice, and you can garnish with chutney, raisins or coconut or be creative.

    Viola

    dscn2316.jpg

    Not Your Mother’s Slow Cooker Recipes for Two Cookbook

    4star.jpg

    Curried Chicken Breasts

    4star.jpg

  • Semolina Pasta With Four-Cheese Sauce

    We used 2 cookbooks for this dish. The pasta recipe is from Cooking with Seasons, which redeemed itself from the disasterous mole recipe, and the sauce recipe is from 50 Great Pasta Sauces. I’d skip buying both of these cookbooks, and just use the recipes posted here. The sauce cookbook is pretty basic, and not much sounds good to us. If you already cook Italian cuisine you already make or have a cookbook with similar recipes. I guess if you are a novice at Italian cooking, this one might be a good purchase, but I would highly recommend you actually browse the cookbook before purchasing it, because I still don’t think that most of the recipes sound spectacular.

    The pasta recipe was a pleasant surprise. The pasta turned out wonderful, which is great, because this recipe has far fewer calories, fat and cholesterol than the traditional egg based dough recipes. Now we just have to figure out the proper proportions to make spinach semolina pasta. Of course all these “savings” from the semolina pasta over the egg pasta are negated with the scrumptious cheese sauce, that’s not low cal or low fat.
    Semolina Pasta:

    2 cups semolina flour or 1 cup unbleached flour and 1 cup semolina flour

    1 tsp extra virgin olive oil (optional)

    1 egg white

    water as needed

    The instructions from the recipe are in italics:

    1. Blend the flours in a bowl and make a well in the center.

    Add the olive oil and egg white and mix with a fork.

    2. Gradually mix in up to a 1/2 cup water until the dough can be pressed together into a solid ball.

    We blended 2 cups of semolina flour only with the olive oil, egg white, and water in the mixer with the dough hook on. It ended up pretty crumbly, but once the dough got onto the pastry board we use it was easy to make into a ball and begin kneading.

    3. Transfer the dough to a lightly floured surface and knead it for a few minutes. The dough should come cleanly away from the surface. If it is too wet, incorporate flour 1 TBSP at a time until the dough is no longer sticky. If the dough is dry and crumbly incorporate water until it is pliable.4. Knead the dough about 3 minutes or until smooth and elastic.

    5. Wrap the dough in a towel and let it rest for 15 minutes before rolling it out.

    We skipped step #5.

    6. Divide the dough into 4 equal pieces. Work with 1 piece at a time, keeping the other pieces in the towel.

    Keep water nearby as well, as it seems like the dough dries out faster than the egg doughs. This could just be operator error, but that will take another time making it to determine 🙂

    7. Flatten the first piece and lightly flour both sides. Set the knob of the pasta machine’s roller for the widest setting. Pass the dough through the feeder, cranking the rollers with one hand and catching the dough with the other.

    8. On a lightly floured surface, fold the piece into thirds and press down to flatten it. Run it lengthwise through the machine once more. Repeat the process 2 more times, folding the dough into thirds each time.

    9. Adjust the control to the next smaller setting, and feed the entire sheet through the machine, without folding. Repeat, narrowing the setting each time, until the desired thickness is achieved-usually to the second to last setting. Flour the dough as necessary to prevent it from sticking. Continue with remaining pieces of dough.

    We made spaghetti with the dough and the final setting on the roller was #5 (it’s a KitchenAid pasta roller which works on their mixers.) The order of roller numbers is #1, then #3, then finally #5.

    10. Let noodles dry slightly on a drying rack or laid flat over towels or cook promptly is generously salted water for 2-3 minutes.

    The cooking time is pretty accurate. Be sure to check at 2 minutes.

    Four-Cheese Sauce

    1/2 cup heavy cream

    1/4 cup shredded fontina cheese or fresh mozzarella

    2 oz Gorgonzola cheese, crumbled

    1/2 cup whole-milk ricotta cheese (can substitute cottage cheese)

    1/2 tsp. minced fresh thyme (or 1/4 tsp. dried thyme)Salt and Pepper to taste

    Top with basil and parmesan cheese

    Note: we actually doubled the sauce to make a super creamy sauce for 1 pound of pasta. The recipe as written doesn’t seem to make a whole lot of sauce.

    1. In a medium saucepan, combine the cream, fontina, Gorgonzola and ricotta. You can substitute cottage cheese for the ricotta. I know it sounds strange but it works–I took out our ricotta, opened it up and discovered the seal was broken, so we substituted with the cottage cheese and it was tasty.

    2. Warm slowly over low heat, stirring constantly, until the cheeses have melted. Stir in the thyme, salt and pepper.

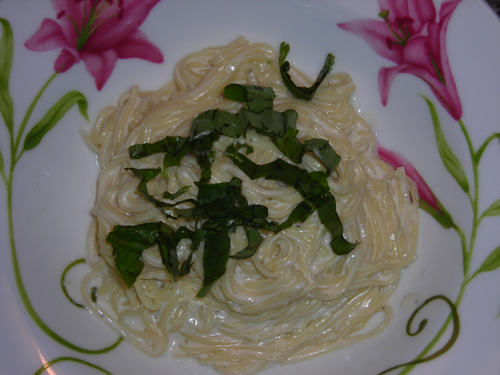
    3. In a large pot of salted boiling water, cook the past until al dente. Transfer cooked pasta into the cheese sauce sauce pan and mix or put pasta into a large serving bowl and combine with sauce. Garnish with parmesan and basil.

    Viola
    dscn2259.jpg

    Cooking with Seasons Cookbook Rating

    2star.jpg

    50 Great Pasta Sauces Cookbook Rating

    2star.jpg

    Semolina Pasta Recipe
    4star.jpg

    Four-Cheese Sauce Recipe

    4star.jpg

  • A Great Mexican Meal: Ropa Vieja, Rice, Beans, and Three Salsas

    The Salem Statesman Journal has put my latest article up on its D’Lish website. The recipes are for a Mexican meal with ropa vieja (a shredded beef dish), Mexican rice (Rachel’s recipe), pinto beans, and three excellent salsas.

    Read it here!

    5star.jpg

  • Chocolate Tasting Notes: Endangered Species, Dagoba, Valor

    In my continuing research on chocolate, I like to taste and score various chocolate bars. For scoring I used my “three Ts” — taste, texture, and toppings. Taste refers to both the overall taste of the chocolate and, if there are toppings, the chocolate part of the flavor. That’s why a bar can get a 2/5 for taste but only a 1/5 for toppings (the chocolate part of the flavor brought the score up.)

    Endangered Species Chocolate Eco Rounds
    Caramelized cocoa nibs in “exquisite” chocolate
    Taste: 3/5. Good flavor but not strong. Slight roasted flavor.
    Texture: 5/5. Melts nicely in mouth, nibs are crunchy.
    Toppings: 4/5. Nibs contribute to both flavor and texture.
    Purchased at: Fred Meyer

    Endangered Species Dark Chocolate with Deep Forest Mint, 70%
    Taste: 4/5. Good blend of chocolate and mint. Chocolate flavor very good.
    Texture: 5/5. Very smooth.
    Toppings: 5/5. Excellent mint flavor.
    Purchased at: Fred Meyer

    Dagoba Lavender and Blueberries 59%
    Taste: 2/5. Lavender overpowers all else. Tastes like Grandma’s bathroom.
    Texture: 3/5. Smooth but clumpy mouth feel, not much addition from berries.
    Toppings: 1/5. Lavender is overpowering and lingers too long in mouth. Blueberries add nothing.
    Purchased at: Fred Meyer

    Valor Dark 70%
    Taste: 4/5. Rich, bitter, strong.
    Texture: 4/5. Good smooth melt in mouth.
    Toppings: n/a
    Purchased at: Cost Plus

  • Notes On Truffles and Ice Cream

    These are the notes I originally wrong that go along with the creation of the truffles and ice cream I wrote about in this post. It was originally put up on the Salemfood website, which is why I write things like “Christmas party coming up.”

    Chocolate Ice Cream Notes
    I put this on the page for the story, but I’ve had great success using a mix of the Lindt 70% cacao dark chocolate and the Lindt milk chocolate. The flavors balance nicely and the mix provides high, medium, and low notes. Using all dark tends to result in mostly medium and low notes, but I won’t say it tastes bad, as it’s still really good. The Lindt bars are 3.5 ounces each, so the total weight of the bars is 7oz.I’m sure some people are wondering why the ice cream has no eggs in it. The answer is simple: they aren’t necessary. One of the best parts of the recipe is its simplicity in preparation. The other best part is the how mindblowing the result is. The key is the cream.

    On a recent episode of Top Chef the chefs had to do an ice cream challenge, and one chef was complaining about how difficult it was to make the ice cream creamy. Well it’s harder when you skip the cream and rely on eggs and milk!

    Yeah yeah yeah you shouldn’t eat large portions of this ice cream. It’s got a TON of fat in it. But it’s so good that you will be satisfied with a smaller portion. Trust me.

    You can leave out the chocolate and use the base recipe for pretty much any kind of ice cream you want. For instance, for mint chocolate chip, leave out the melted chocolate, add 1-2 teaspoons of the mint extract of your choice, and add chocolate chips when it comes time to add the toppings. Easy.

    Here are some pictures for you…

    dscn1226.JPG

    Melting chocolate

    dscn1227.JPG

    Melted chocolate

    dscn1228.JPG

    The mix, ready to be chilled

    dscn1234.JPG

    It’s not pretty yet, but oh so good

    dscn1252.jpg

    I added marshmallows for the topping and smashed up some chocolate covered peanuts for garnish

    If you are wondering, I did the photography as well. I would do pictures of a plate, Rachel and I would eat it before it melted too much, and then I would clean the plate and set up another scoop. Not bad work.

    Truffle Notes
    The truffles got top billing and for good reason. They are freaking awesome and like the ice cream, not too difficult to make. Here’s some truffle porn for you…

    dscn1283.jpg

    Coating starting from the left: Santander 70% with pineapple and toasted coconut (“tropical”), Valor 70% with mint, cocoa powder, Perugina white chocolate with semi-sweet drizzle

    From another angle:

    dscn1278.jpg

    My favorite truffle base came about pretty much by accident. I wanted to do a shot of chocolate bars so I bought a variety of bars at Cost Plus. When it came time to make truffles, I saw what I had to work with and said “why not?” I ended up using a Santander 70% Colombian single origin bar, a Valor 70% bar, and a Perugina dark chocolate bar (no percentage listed, sorry.) It was absolutely amazing.

    A couple of weeks later we made a huge batch for Thanksgiving and I used all Lindt 70% dark, which is an excellent chocolate mind you and created excellent truffles that were loved by all, but the mix was even better.

    On to practical matters…

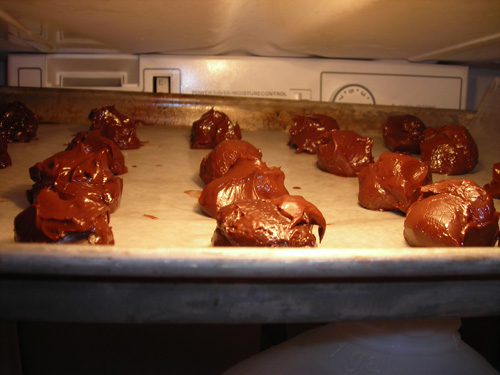
    Be patient during the process of making these. Chilling is extremely important.

    dscn1255.jpg

    You will also rediscover your love of wax paper. Wax paper is your friend.

    The universe of toppings for these things is huge. If you can melt it or get it to stick without falling off you can probably use it.

    dscn1259.jpg

    Toasted coconut

    dscn1260.jpg

    Topping the truffles — tropical up top, mint bottom right

    Of the four I made for the story, my tasters (Rachel, her dad, stepmom, and brother, J-me, and the BeekeeperTM) liked the mint the best, followed by the white chocolate, the tropical, and the cocoa powder. But keep in mind the quantitative values were something along the order of “Oh my God,” “Incredible,” “Amazing,” and “I liked the cocoa powder the least.” Poor cocoa powder.

    For Thanksgiving we did the white chocolate and mint variations. We also did some just for us topped with Dagoba latte chocolate, which is like a mild Mexican chocolate. Which is to say, it was awesome. I am making more for a Christmas party coming up, and will definitely do the mint again and may try using a melted Mexican chocolate tab (it’s been awhile since I’ve melted one, so I’m not sure how well it will work.)

    And for the record, the Valor 70% dark chocolate bar with mint is one of my favorites. Excellent! You can get it at Cost Plus. Overall I was pretty impressed with the Valor brand bars.

  • Smashed: Something Called Mole

    As part of my food writing duties I have been given “Cooking With the Seasons” by Lesa Heebner to review. Though the review will ultimately be pretty short, I’m still doing some test cooking from the book to see if it’s something worthwhile. Unfortunately, my first experience was not a good one.

    I made the Puebla-style Mole Sauce with Chicken Strips recipe from page 118. Or more accurately, made the mole sauce and took the family out for Indian food.

    Mole is generally a very complex chile sauce, usually with 20-30 ingredients. Some people focus on the chocolate in many versions of the sauce, but I’ve never had a version where I’ve said “wow, chocolate sauce.” In a good mole, the flavors will be balanced so no one flavor dominates and the heat level can vary from mild to very hot.

    Heebner’s mole is scaled down ingredient wise, though it hits most of the categorical high points — chiles, spices, and chocolate. One thing the recipe lacks is a starch for thickening, usually represented by a slice of bread or a day old corn tortilla. Another noticeable difference from other mole recipes is that none of the spices are toasted.

    And in the end, these differences matter. The sauce tasted like a cinnamon sauce (my biggest pet peeve with moles!) with a faint background of chicken stock. It had a gritty texture to go along with the taste to start, so I strained it to see if that helped. Nope, can’t say that it did. It just made it a watery cinnamon sauce with a faint background of chicken stock.

    We haven’t tested any other recipes yet, but I am fearful.

    The upside is that we learned that our 2-yr old likes dal.

    Amazon sells Heebner’s cookbook. Check it out here if you dare.

    1star.jpg

  • Ratings

    All cookbooks, recipes, and anything food related is rated on a 5 star system:

    5 Stars: Exceptionally Superb

    4 Stars: Excellent

    3 Stars: Good

    2 Stars: Ok, but won’t make again

    1 Star: Inedible

  • Taco Soup

    taco-soup.jpg

    This Taco Soup recipe is an adaptation from Paula Deen’s recipe. Her recipe serves 12-16, while our adaptation serves 5-6 hearty portions.

    Ingredients:

    • 1 package of ground turkey, chicken or beef (approximately 1lb.)
    • 1 cup diced onions
    • 1 15 oz. can of pinto beans, drained and rinsed
    • 1 15 oz. can of kidney beans, drained and rinsed\
    • 1 cup frozen corn
    • 2 15 oz. cans of Stewed Tomatoes (Mexican or Regular)
    • 1 15 oz. can of tomatoes with Chiles (such as Rotel)
    • 2 4 oz. cans of diced green chiles
    • 1/2 of a 1.25 oz. package of taco seasoning
    • 1/2 of a 4 oz. package of ranch salad dressing mix
    • Corn chips for serving
    • Garnishes: sour cream, grated cheese, chopped green onions, pickled jalapenos, olives, hot sauce (we used Tabasco Chipotle)

    Directions:

    1. Brown the meat and onions in a large skillet; drain the excess fat, then transfer the browned meat and onions to a large slow cooker or a stockpot. Add the beans, corn, tomatoes, green chiles, taco seasoning, and ranch dressing mix, and cook in a slow cooker on low for 6 to 8 hours or simmer over low heat for about 1 hour in a pot on the stove.
    2. What did we do differently from Paula Deen’s recipe? Other than halving it, we used ground turkey instead of beef, we adjusted the tomato products by adding 2 cans of stewed tomatoes and the entire can of tomatoes with chiles, and the original recipe calls for cooking olives in the soup, but we opted to omit this step. Next time we make this recipe, we’ll add 2 cans of green chiles (that’s why I included it in the above recipe).
    3. We used the slow cooker method and cooked it for 6 hours. The turkey was very tender and the flavor of the soup was excellent. There was a lot of flavor without being too spicy, which is great if you are serving this dish to children. Each diner has the ability to make this soup his own by adding the toppings, thus you can adjust the spice level too. The soup is extremely easy to make, and requires no attention if you are entertaining. If you have a large crowd this also makes for a great entertaining dish since the full recipe (basically double everything) serves 12-16.
    4. We’ll definitely make this soup again.

    4star.jpg

  • Chocolate Ice Cream and Truffles

    dscn1252.jpg

    Back in December I wrote a piece for the Salem Statesman Journal on high end chocolates, and in it I put two incredibly good recipes for chocolate ice cream and chocolate truffles.

    Check it out here. Read my notes about the recipes here.

    5star.jpg

  • Star Ratings

    All cookbooks, recipes, and anything food related will be rated on a 5 star system:

    5 Stars: Exceptionally Superb

    4 Stars: Excellent

    3 Stars: Good

    2 Stars: OK, but won’t make again

    1 Star: Inedible